

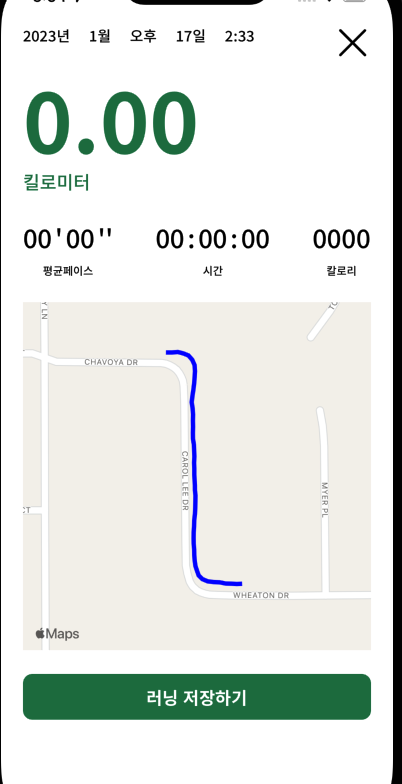
러닝앱에서 러닝을 끝내면 러닝 결과를 보여주는 화면이 나타난다. 이때 이 화면에서 지도와 함께 뛴 루트를 보여준다.
이때 지도를 넣고 오버레이를 그리는 방식으로 구현해도 되지만, 지도는 많은 자원을 사용한다. 단순히 경로를 보여주는 역할을 하기에는 자원 사용률이 높아서 과하다고 생각했고, 이를 이미지로 만들어서 보여줄 수 있는 방법이 없을까 했는데, MKMapSnapshotter라는게 있어서 사용해 보았다.
MKMapSnapshotter
지도와 지도의 컨텐츠를 이미지로 캡처해 주는 기능을 제공하는 클래스 입니다. 지도를 보여주지만, 상호작용이 필요하지 않을때 사용하는 것을 추천하고 있습니다. 지도를 캡처할 때, 오버레이나 annotation 까지 같이 표시해주지 않습니다. 따라서 캡처한 이미지 위에 오버레이를 표시하고 싶다면, 직접 그려야 합니다. 다행히도, 이를 위한 기능이 제공되며 이를 통해 쉽게 원하는 오버레이나 annotation을 그릴 수 있습니다. 참고로 지도를 캡처하는 작업은 비동기 입니다.
MKMapSnapshotter.Options
지도를 캡처 할 때, 옵션을 설정하여 원하는대로 캡처를 할 수 있습니다. MKPointOfInterestFilter를 통해 point of interest(마트, 식당, 카페 등등을 표시하는 글자들)를 본인이 원하는대로 보이게할수도, 안보이게 할 수 있으며, 건물을 보이지 않게 할수도 있습니다.
private func setSnapshotOptions(coordinates: [CLLocationCoordinate2D]) -> MKMapSnapshotter.Options {
        let options = MKMapSnapshotter.Options()
        let filter: MKPointOfInterestFilter = .excludingAll //모든 point of interest가 안보이도록

        options.pointOfInterestFilter = filter
        options.size = CGSize(width: 400, height: 400)
        options.showsBuildings = false // 건물 안보이게

        return options
    }
원하는 지도 지점 설정하기
MKMapView에서 원하는 지점을 보게하는 방법과 다르지 않습니다. MKCoordinateRegion을 생성해서 MKMapSnapshotter.Options에 넣어주면 됩니다. 그러나 경로 전체를 지도상에서 보여줘야 하기에, 경로의 좌표를 이용해 MKCoordinateRegion를 만들어줍니다. 1.5배를 한 이유는 지도 경계선에 경로의 끝 부분이 붙어있지 않게 하기 위함입니다.
// 러닝 경로 좌표 중심값
func getRunningRouteCenterCoordinate(coordinates: [CLLocationCoordinate2D]) -> CLLocationCoordinate2D? {
        guard coordinates.isEmpty == false || coordinates.count > 1 else { return nil }

        var centerLat: CLLocationDegrees = 0
        var centerLon: CLLocationDegrees = 0

        for coordinate in coordinates {
            centerLat += coordinate.latitude
            centerLon += coordinate.longitude
        }

        centerLat /= Double(coordinates.count)
        centerLon /= Double(coordinates.count)

        return CLLocationCoordinate2D(latitude: centerLat, longitude: centerLon)
    }

// 최대, 최소 위경도 구해서 MKCoordinateRegion 생성
func makeRouteSizeRegion(center: CLLocationCoordinate2D, coordinates: [CLLocationCoordinate2D]) -> MKCoordinateRegion {

        let minLatitude = coordinates.min(by: { $0.latitude < $1.latitude })?.latitude ?? 0
        let maxLatitude = coordinates.max(by: { $0.latitude < $1.latitude })?.latitude ?? 0
        let minLongitude = coordinates.min(by: { $0.longitude < $1.longitude })?.longitude ?? 0
        let maxLongitude = coordinates.max(by: { $0.longitude < $1.longitude })?.longitude ?? 0
        let span = MKCoordinateSpan(latitudeDelta: (maxLatitude - minLatitude) * 1.5, longitudeDelta: (maxLongitude - minLongitude) * 1.5)

        return MKCoordinateRegion(center: center, span: span)
    }

 //options에 적용
  options.region = makeRouteSizeRegion(...)
경로가 그려진 지도 이미지 생성
option의 설정이 모두완료 됬으니, 이제 이미지를 생성할 시간입니다. MKMapSnapshotter를 이용해서 지도 이미지를 생성합니다.
MKMapSnapshotter 객체를 options를 넣어 생성 한 후, completionHandler를 통해 지도 이미지를 가져옵니다.
func setRouteImage(route coordinates: [CLLocationCoordinate2D]) {
        let options = setSnapshotOptions(coordinates: coordinates)
        let snapShotter = MKMapSnapshotter(options: options)
        snapShotter.start { snapshot, error in
            guard let snapshot = snapshot, error == nil else { fatalError() }
            let mapImage = snapshot.image
        }
    }
이제 지도 이미지에 경로를 그려야 합니다. 경로를 그리는 방법은 CAShapeLayer를 이용하여 그려도 되지만, UIGraphicsImageRenderer를 이용하면 경로가 그려진 이미지를 만들 수 있습니다. snapshot.point(for:)은 지도의 좌표 값을 현재 이미지 사진의 CGPoint 값으로 변경해 주는 메소드입니다. 이를 이용해 경로 좌표값으로 지도 이미지에 경로를 정확히 그려 넣을 수 있습니다.
func setRouteImage(route coordinates: [CLLocationCoordinate2D]) {
        let options = setSnapshotOptions(coordinates: coordinates)
        let snapShotter = MKMapSnapshotter(options: options)
        snapShotter.start { snapshot, error in
            guard let snapshot = snapshot, error == nil else { fatalError() }
            let mapImage = snapshot.image
            let runningOverlayMapImage = UIGraphicsImageRenderer(size: mapImage.size).image { _ in
                mapImage.draw(at: .zero)
                let points = coordinates.map { snapshot.point(for: $0) }
                let path = UIBezierPath()
                path.move(to: points.first ?? CGPoint(x: 0, y: 0))

                for point in points.dropFirst() {
                    path.addLine(to: point)
                }

                path.lineWidth = 5
                UIColor.blue.setStroke()
                path.stroke()
            }
        }
    }
이렇게 하면 아래 사진처럼 지도그린 경로를 이미지로 표현 할 수 있습니다. 저는 UIImageView를 서브클래싱 해서 사용했습니다.


전체 코드
import UIKit
import CoreLocation
import MapKit

class CustomRouteMapImageView: UIImageView {

    func setRouteImage(route coordinates: [CLLocationCoordinate2D]) {
        let options = setSnapshotOptions(coordinates: coordinates)
        let snapShotter = MKMapSnapshotter(options: options)
        snapShotter.start { snapshot, error in
            guard let snapshot = snapshot, error == nil else { fatalError() }
            let mapImage = snapshot.image
            let runningOverlayMapImage = UIGraphicsImageRenderer(size: mapImage.size).image { _ in
                mapImage.draw(at: .zero)
                let points = coordinates.map { snapshot.point(for: $0) }
                let path = UIBezierPath()
                path.move(to: points.first ?? CGPoint(x: 0, y: 0))

                for point in points.dropFirst() {
                    path.addLine(to: point)
                }

                path.lineWidth = 5
                UIColor.blue.setStroke()
                path.stroke()
            }
            self.image = runningOverlayMapImage
        }
    }

    private func makeRouteSizeRegion(center: CLLocationCoordinate2D, minLatitude: CLLocationDegrees, maxLatitude: CLLocationDegrees, minLongitude: CLLocationDegrees, maxLongitude: CLLocationDegrees) -> MKCoordinateRegion {
        let span = MKCoordinateSpan(latitudeDelta: (maxLatitude - minLatitude) * 1.5, longitudeDelta: (maxLongitude - minLongitude) * 1.5)
        return MKCoordinateRegion(center: center, span: span)
    }

    private func getRunningRouteCenterCoordinate(coordinates: [CLLocationCoordinate2D]) -> CLLocationCoordinate2D? {
        guard coordinates.isEmpty == false || coordinates.count > 1 else { return nil }

        var centerLat: CLLocationDegrees = 0
        var centerLon: CLLocationDegrees = 0

        for coordinate in coordinates {
            centerLat += coordinate.latitude
            centerLon += coordinate.longitude
        }

        centerLat /= Double(coordinates.count)
        centerLon /= Double(coordinates.count)

        return CLLocationCoordinate2D(latitude: centerLat, longitude: centerLon)
    }

    private func setSnapshotOptions(coordinates: [CLLocationCoordinate2D]) -> MKMapSnapshotter.Options {
        let options = MKMapSnapshotter.Options()

        let minLatitude = coordinates.min(by: { $0.latitude < $1.latitude })?.latitude ?? 0
        let maxLatitude = coordinates.max(by: { $0.latitude < $1.latitude })?.latitude ?? 0
        let minLongitude = coordinates.min(by: { $0.longitude < $1.longitude })?.longitude ?? 0
        let maxLongitude = coordinates.max(by: { $0.longitude < $1.longitude })?.longitude ?? 0
        options.region = makeRouteSizeRegion(center: getRunningRouteCenterCoordinate(coordinates: coordinates) ?? CLLocationCoordinate2D(latitude: 0, longitude: 0), minLatitude: minLatitude, maxLatitude: maxLatitude, minLongitude: minLongitude, maxLongitude: maxLongitude)
        options.size = CGSize(width: 400, height: 400)
        options.showsBuildings = true
        let filter: MKPointOfInterestFilter = .excludingAll
        options.pointOfInterestFilter = filter

        return options
    }

}'iOS > swift' 카테고리의 다른 글
| 파라미터 Protocol 타입과 제네릭의 차이점 (0) | 2023.08.22 |
|---|---|
| Property Wrapper (0) | 2023.07.29 |
| swift 참조 타입과 값 타입, 함수 파라미터의 관계 (0) | 2023.04.27 |
| 참조 타입과 Call by Value, Call by Reference (0) | 2023.04.27 |
| CAShapeLayer 특정 뷰의 중심에 맞추기 (0) | 2023.03.11 |